Tom Clancy’s Rainbow Six: Las Vegas 2
Best Map Routes on Villa
This strategy guide assumes you know the basics of the Rainbow Six and FPS mechanics. If you need a refresher or basic starting point check out this article first. Based on the Terrorist Hunt levels, this is a spawn and lure mission. Don’t be afraid to use a loud gun.
Firstly, you may want to equip certain gear to make this much easier on yourself.
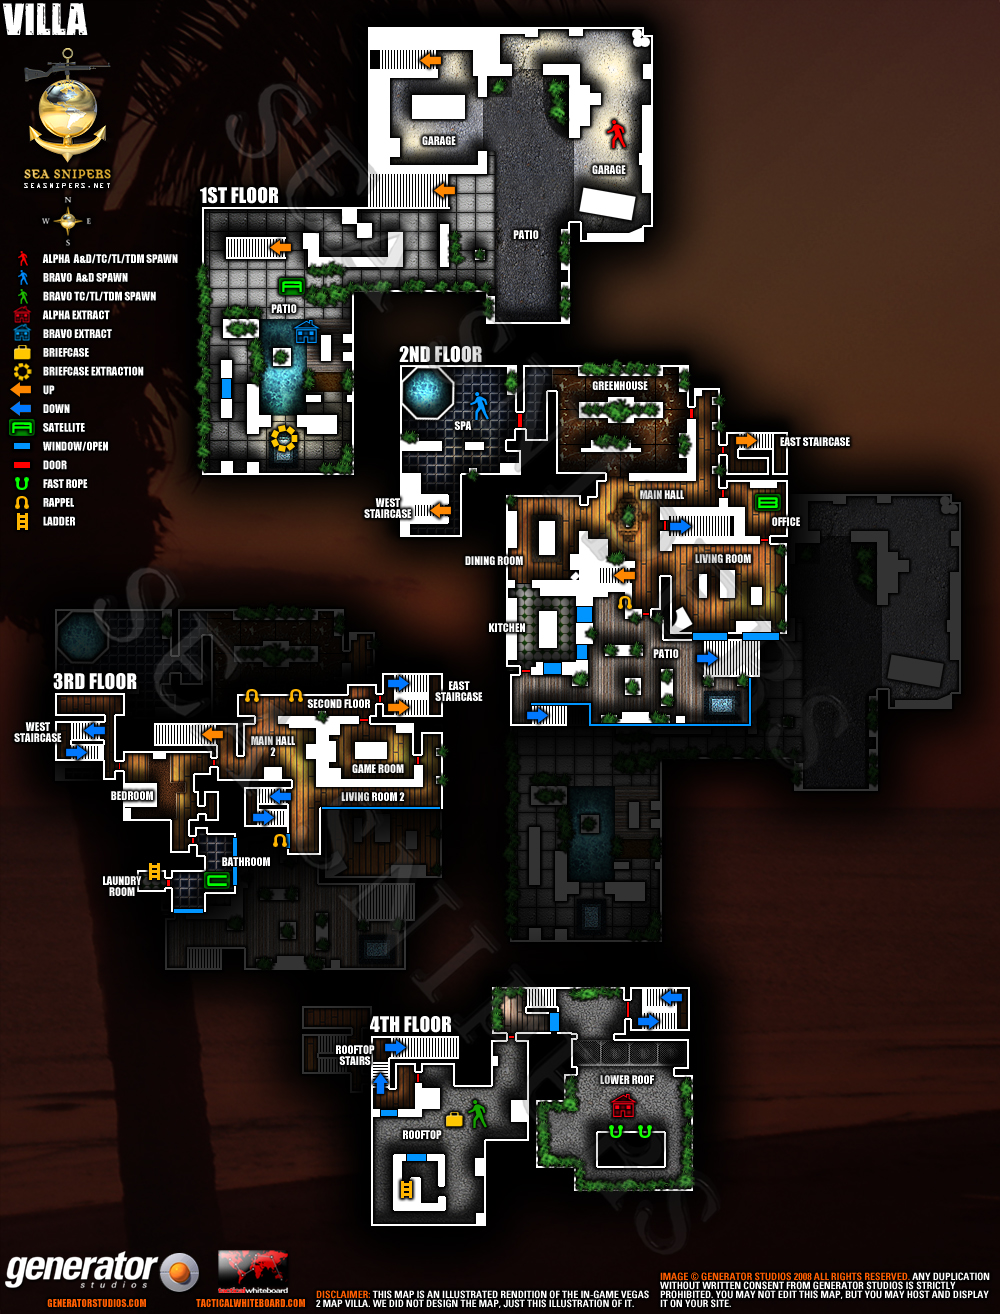
Smoke grenades may not be lethal but the extra cover and stealth capability they provide will prove to be a very useful component to your success. C-4 explosives are always a useful item to have on hand, but the incendiary grenades will prove to be just as worthy, if used properly and appropriately. There are a few different ways you can approach the Villa map, this route is the one that I have the most success with regardless of my weapon choice. At the initial spawn point in the detached garage, you will see an attached garage directly across from you. Inside is typically one enemy standing behind a car, although on occasion, he will not spawn. You will want to keep tight right and follow the path out to the side of the garage attached to the mansion.

Now, as tempting as it will be to just run in guns blazing and take him out, do not. Instead, silence your rifle, stick close to the wall, take cover, and go for the head shot. Quick kills are your best friend. After you take care of the enemy in the garage, start heading up the staircase and toss a C-4 on the door and wait for it to be opened by another enemy and then blow the C-4. Typically, anywhere from two to four enemies should be taken out by the explosion, but the coast is not clear yet. Use the ever-handy smoke grenade to create a cloud of safety at the opening where the door once was and turn your thermal goggles on.
You will notice that there is another enemy directly across from you hiding in a dining area. Stay in front of the door in your smoke screen and take him out. Once you got him, go to the right and head around the turn towards the first door on the wall and take cover on either side; it won’t make a difference which side of the door you’re at as long as you are still able to open it and shoot in. Be very careful opening this door, most of the time there is only ever one guy in this little office room, but sometimes he has a companion sitting around the corner waiting to take you out. If you want, toss another smoke in the room; it never hurts to be cautious in this game. Instead of continuing through the room, turn around and go to the next door on the same wall and start heading upstairs. From time to time, there may be an enemy in that stairwell, take care of him and proceed to the top of the stairs where you will come across a set of red double doors.
This is where it starts to get a tad bit obnoxious as the amount of enemies just on the other side of those doors seems to constantly be different. The most I have ever encountered myself was five and I didn’t make it out unscathed, to say the least. Utilize the smoke grenades to create that wonderful smoke screen and take out anybody that happens to be up there with you. Don’t run up the stairs you see when you came through the doors, as an enemy or two may come up behind you and kill you. To the left of the doors is a skylight, head that direction and go to your right where there is a wall space just big enough to provide you with cover, wait a minute or so to be sure that nobody comes towards you, if so, you know the drill.
Now is the time to go up the rooftop stairs and open up that single red door. Again, be cautious of any possible enemies. Refer back to the cover and shoot method, as it’s the best way to ensure your survival. In this area, you will see a small room that stands alone with an arch way and a window, in that little room is a ladder that leads down to the master bathroom. If you would like to, toss a couple C-4s down there and rid yourself of any unwanted guests. Or, you can just go to the doorway on your right hand side and sit at the top of that staircase and stack the enemies up, just make sure that you check the window so you don’t die, since you’ve already made it this far. Just like that, you have now found the easiest and safest route to take while doing the Terrorist Hunt mode on the Villa level in Tom Clancy’s Rainbow Six: Las Vegas 2.
I hope this was helpful to anyone who still happens to play this game. Share your best map hacks and strategies below or Tweet to me @Slickster_Mag.
